What do ClawTab tmux utils do?
Add one line to your .tmux.conf and get a lazygit-style popup for controlling Claude Code sessions. Toggle auto-yes, fork conversations into new panes, inject secrets as environment variables, and search your skills library - all without leaving the terminal.
# Clone the repo
git clone https://github.com/tonisives/clawtab.git ~/.clawtab

# Add to ~/.tmux.conf
run-shell ~/.clawtab/tmux-clawtab/clawtab.tmux

# Reload tmux config
tmux source-file ~/.tmux.conf
Easiest Way to Set Up
The tmux plugin lives in the ClawTab GitHub repo under tmux-clawtab/. Clone it once and point your tmux config at it.
Step 1: Clone the repo (or just the tmux-clawtab directory).
git clone https://github.com/tonisives/clawtab.git ~/.clawtabStep 2: Add to your tmux config. Open ~/.tmux.conf and add:
run-shell ~/.clawtab/tmux-clawtab/clawtab.tmuxStep 3: Reload tmux. Either restart tmux or run:
tmux source-file ~/.tmux.confThat's it. The plugin registers keybindings, sets up the auto-yes indicator in your pane borders, and is ready to go. No dependencies beyond tmux itself - the popup menu is a pure bash TUI that works without fzf or any external tools.
If you use TPM (tmux plugin manager), you can also add it manually with the run-shell directive - TPM is not required.
The Popup Menu
Press prefix + E to open the ClawTab popup. It's a tabbed TUI inspired by lazygit with three tabs: Shortcuts, Secrets, and Skills.
| Key | Action |
|---|---|
Tab / Shift+Tab | Switch between tabs |
j / k or arrows | Navigate items |
Space | Toggle selection (multi-select) |
/ | Search / filter |
Enter | Execute selected action |
Esc or q | Close popup |
The popup only activates on Claude Code panes. It detects Claude Code by checking if the pane's current command matches a semver pattern (the way Claude Code reports itself to tmux). If you try to open it on a regular shell pane, it tells you and closes.
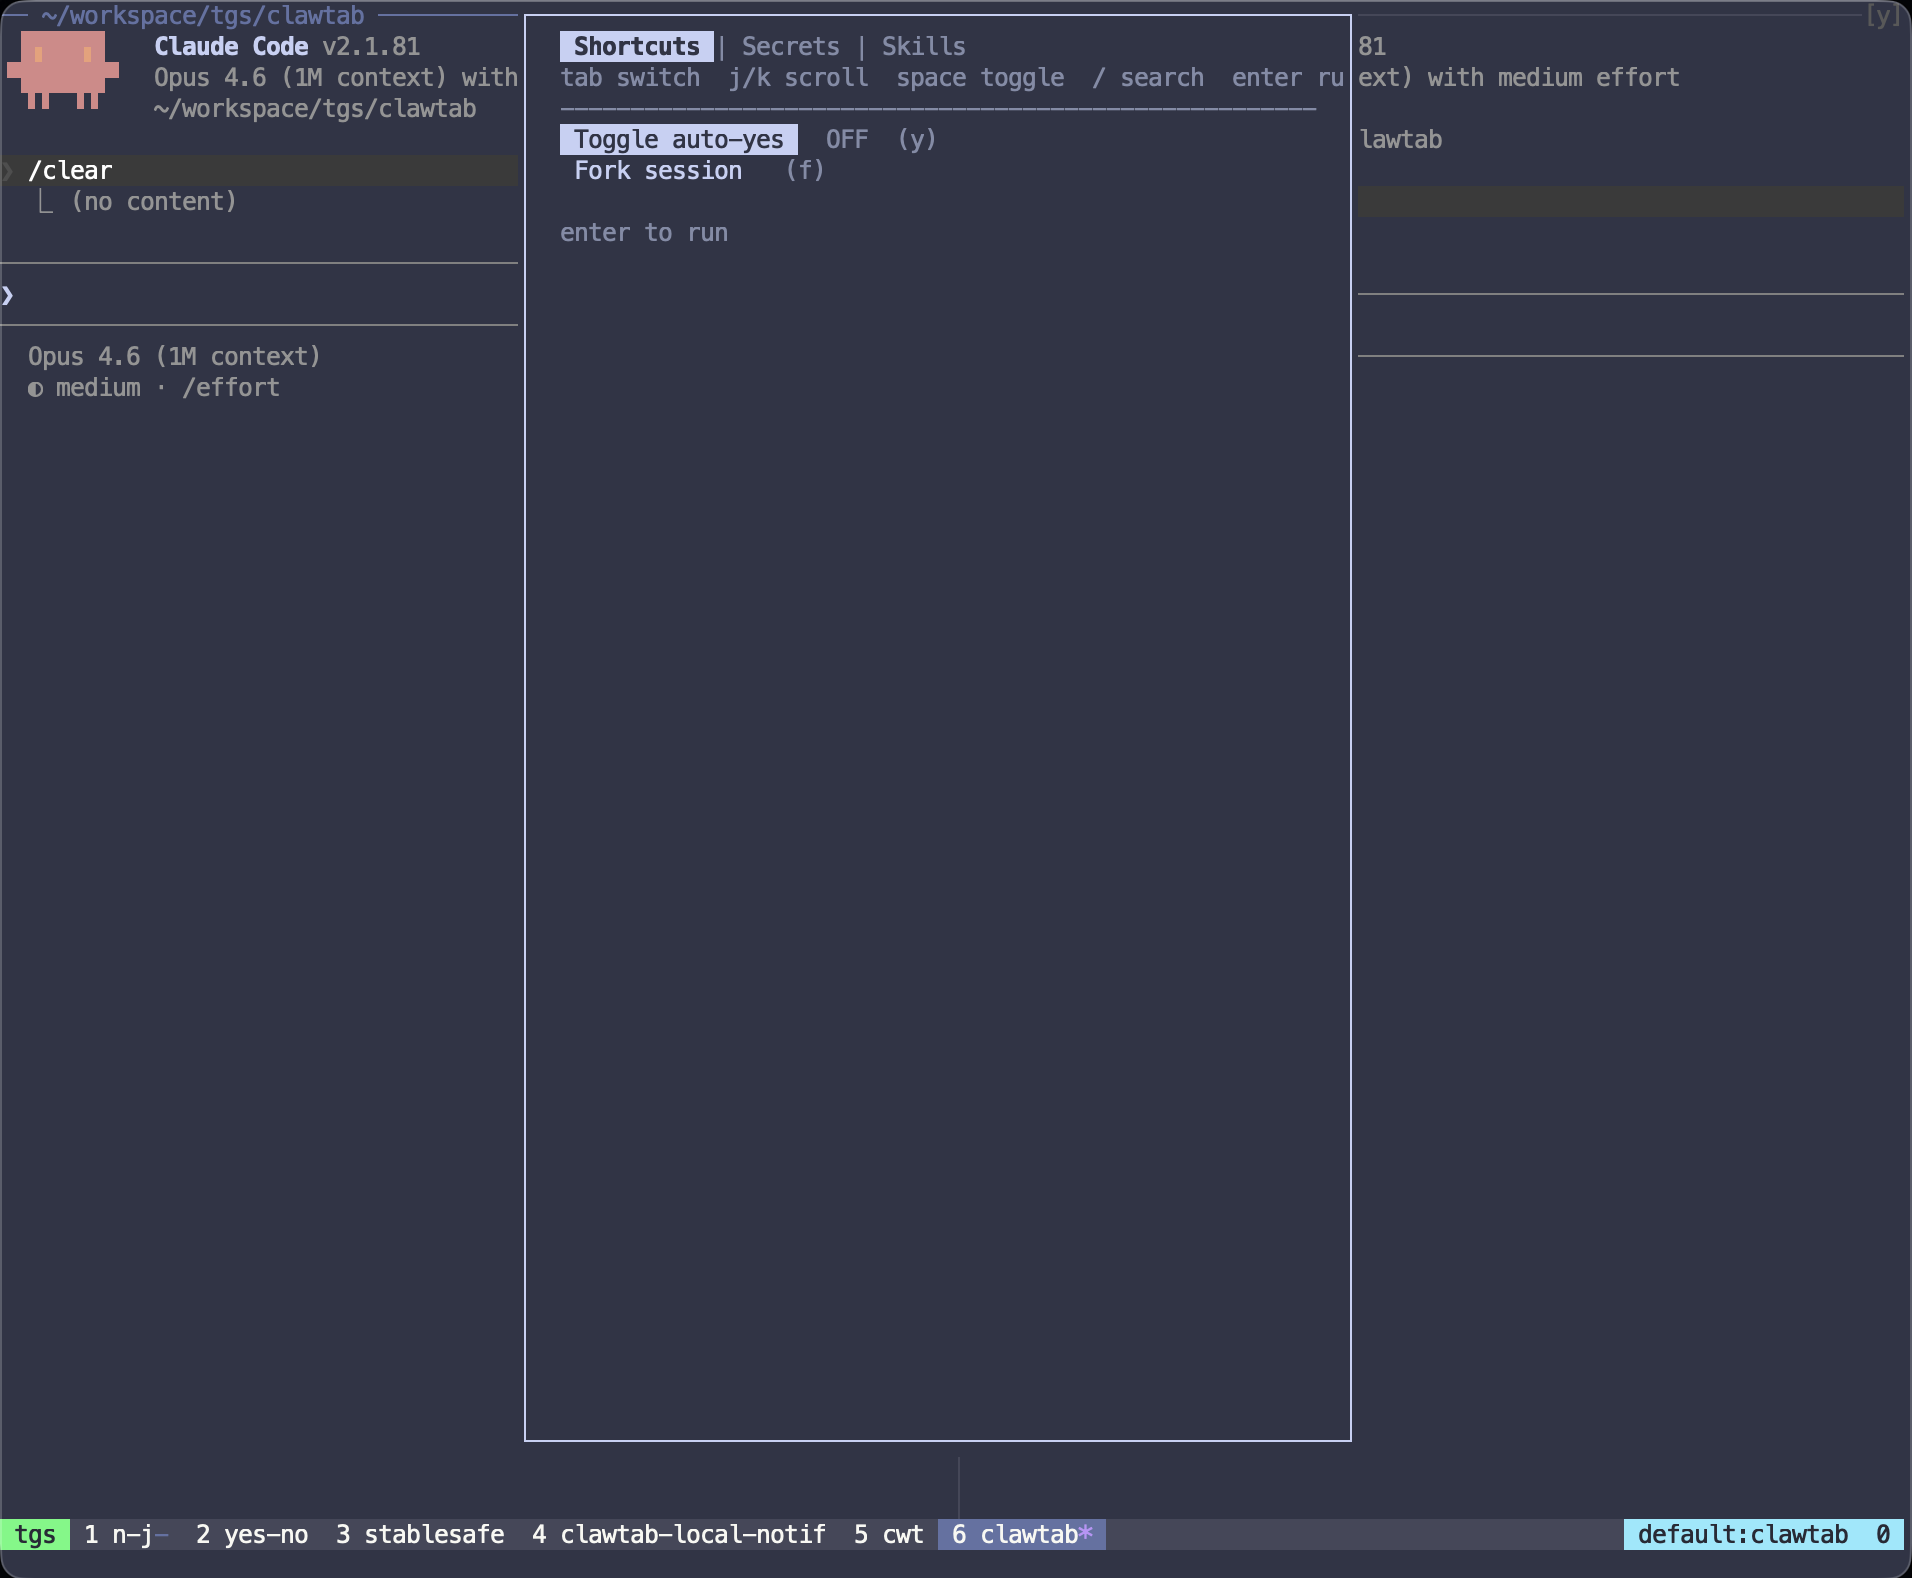
Shortcuts Tab
The first tab shows two quick actions:
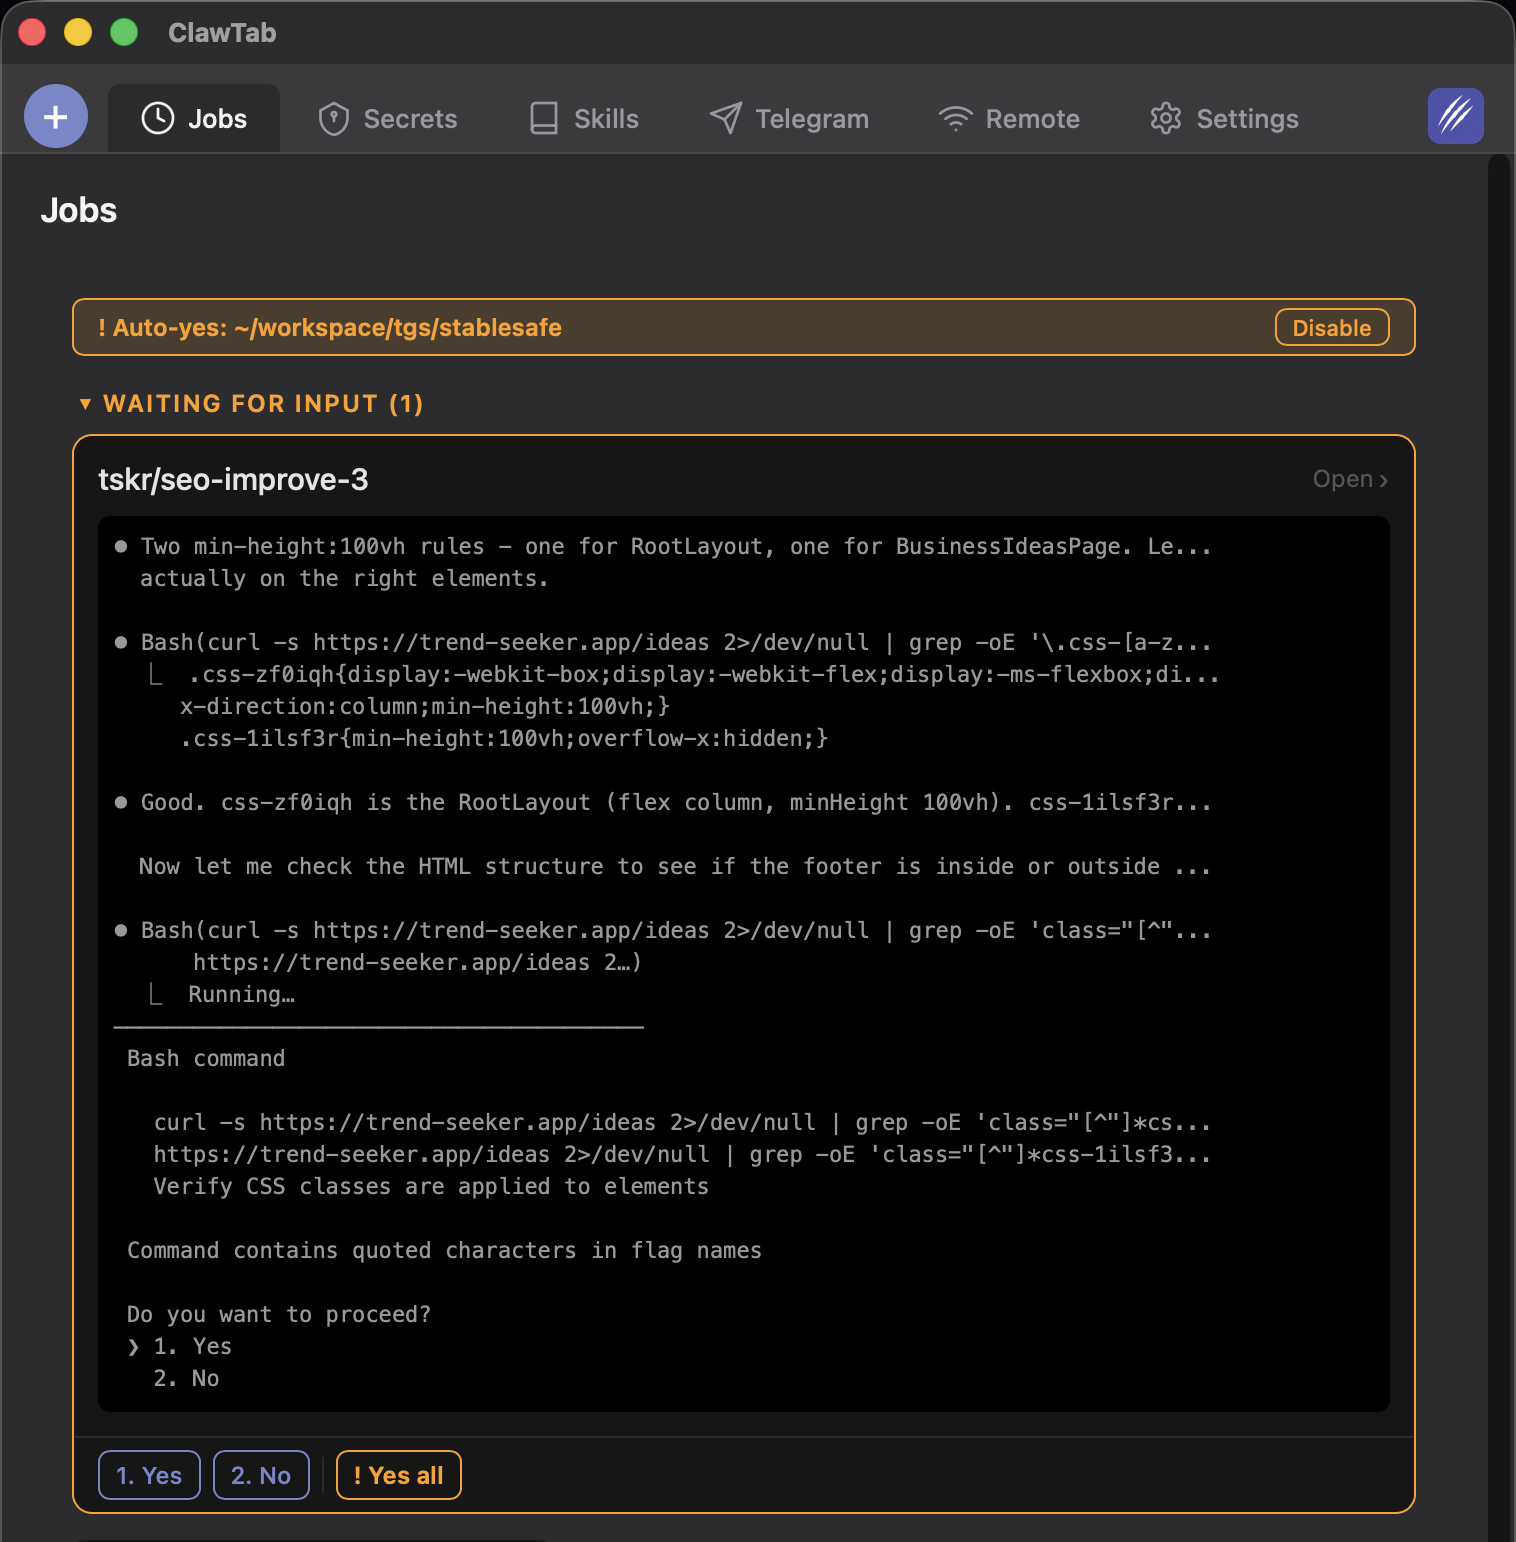
Toggle auto-yes. Flips auto-yes mode on or off for the current pane. The status shows ON (green) or OFF (dim) right next to the label. This does the same thing as prefix + y but from within the menu. The toggle syncs with the ClawTab desktop app via cwtctl in the background, so the state is consistent across your terminal and the GUI.
Fork session. Takes the current Claude Code conversation and forks it into a new tmux pane below. The forked session continues from the same conversation context using claude --continue --fork-session. Useful when you want to branch an agent's work in two directions - keep the original running on one task while the fork explores an alternative approach.
Each shortcut also shows its direct keybinding (y for auto-yes, f for fork) so you can learn the shortcuts and skip the menu next time.
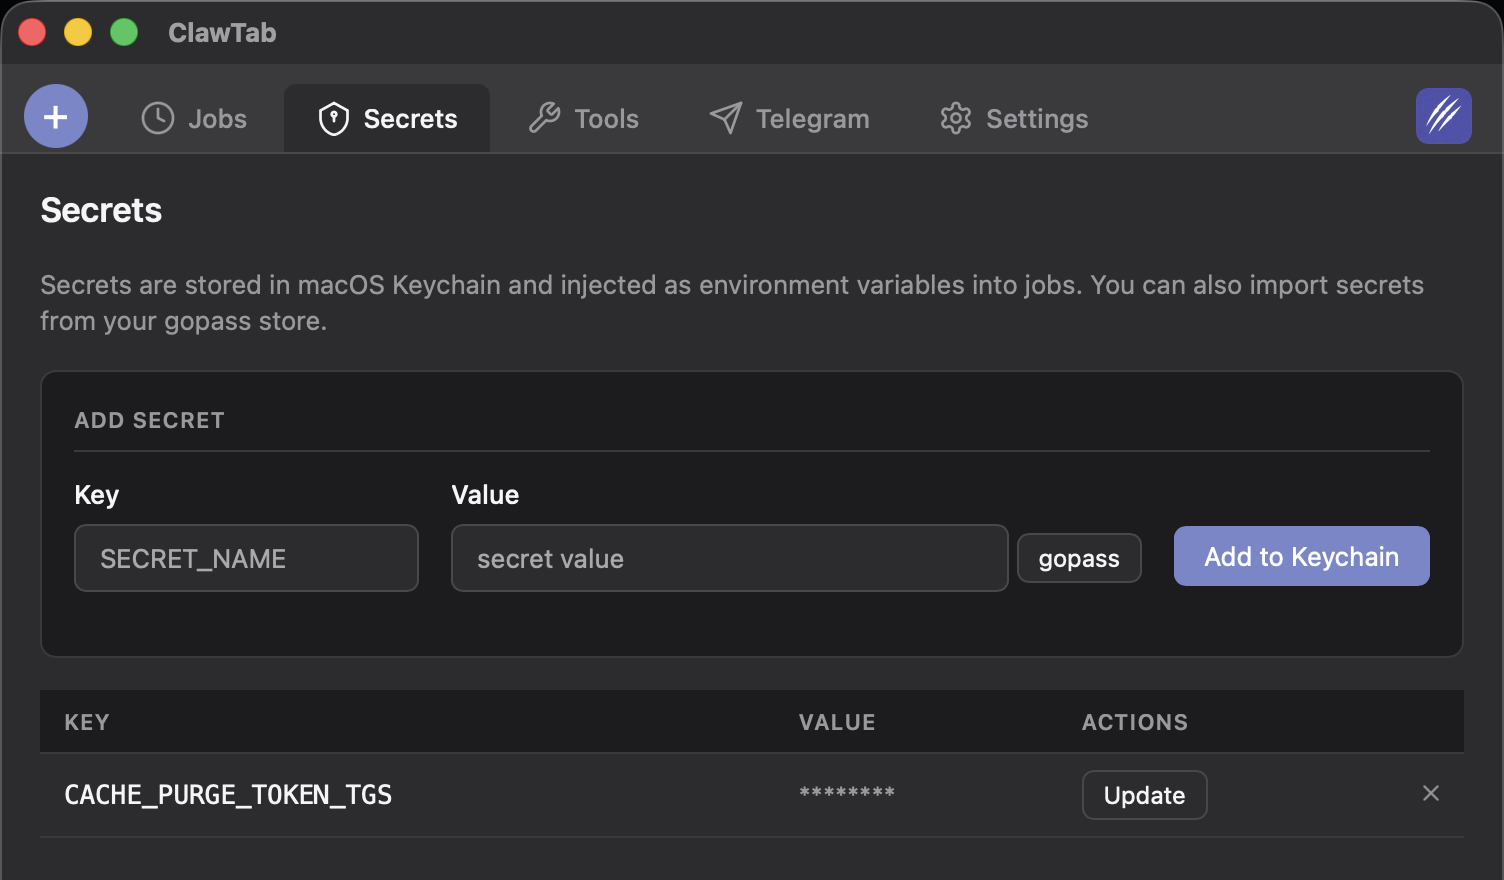
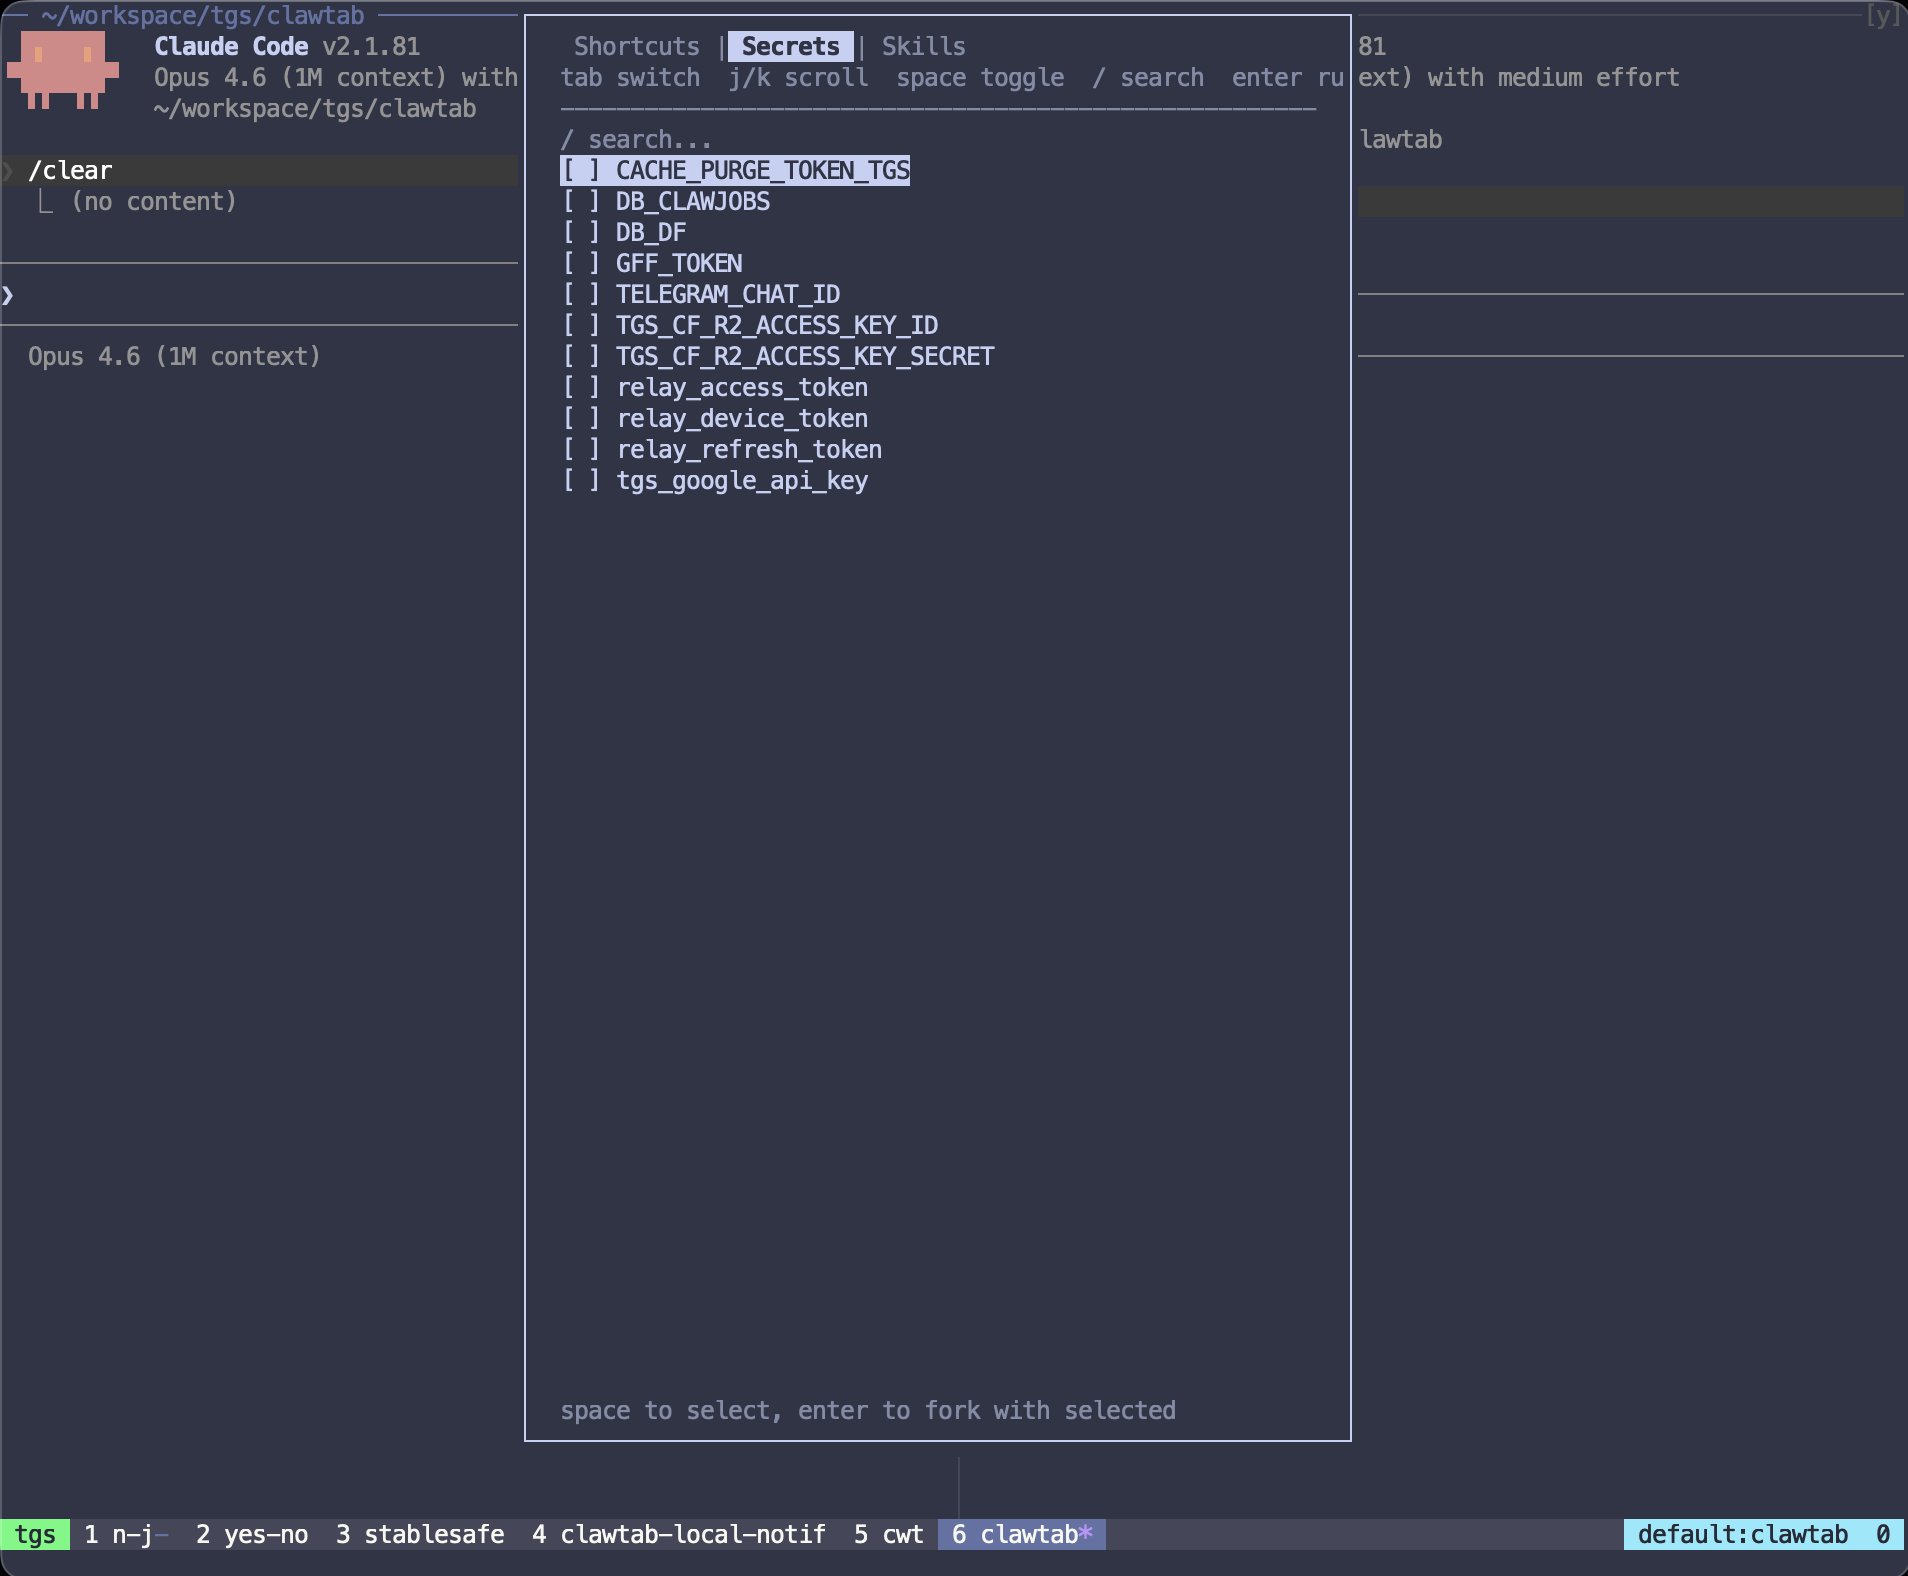
Injecting Secrets Into a Forked Session
The Secrets tab lists all secrets stored in your ClawTab secret store (Keychain or gopass). Select one or more secrets with Space, then press Enter to fork the current session with those secrets injected as environment variables.
Here's what happens under the hood:
- You select secrets (e.g.,
CACHE_PURGE_TOKEN_TGS,DB_CLAWJOBS) - The plugin sends "forking" to the current pane to mark the conversation
- It fetches the secret values via
cwtctl secrets get - A new pane opens with
tmux split-window -e KEY=value, passing each secret as an environment variable - Claude Code starts in the new pane with
--continue --fork-sessionand receives a prompt like "added $CACHE_PURGE_TOKEN_TGS, $DB_CLAWJOBS env"
The forked session has access to the secrets as regular environment variables. Claude Code can read them with standard shell access. The secrets never touch disk - they're passed as tmux environment flags and exist only in the pane's process environment.
This is the fastest path from "I need to give this agent database access" to a running agent with credentials. No .env files, no manual exports, no copy-pasting tokens.
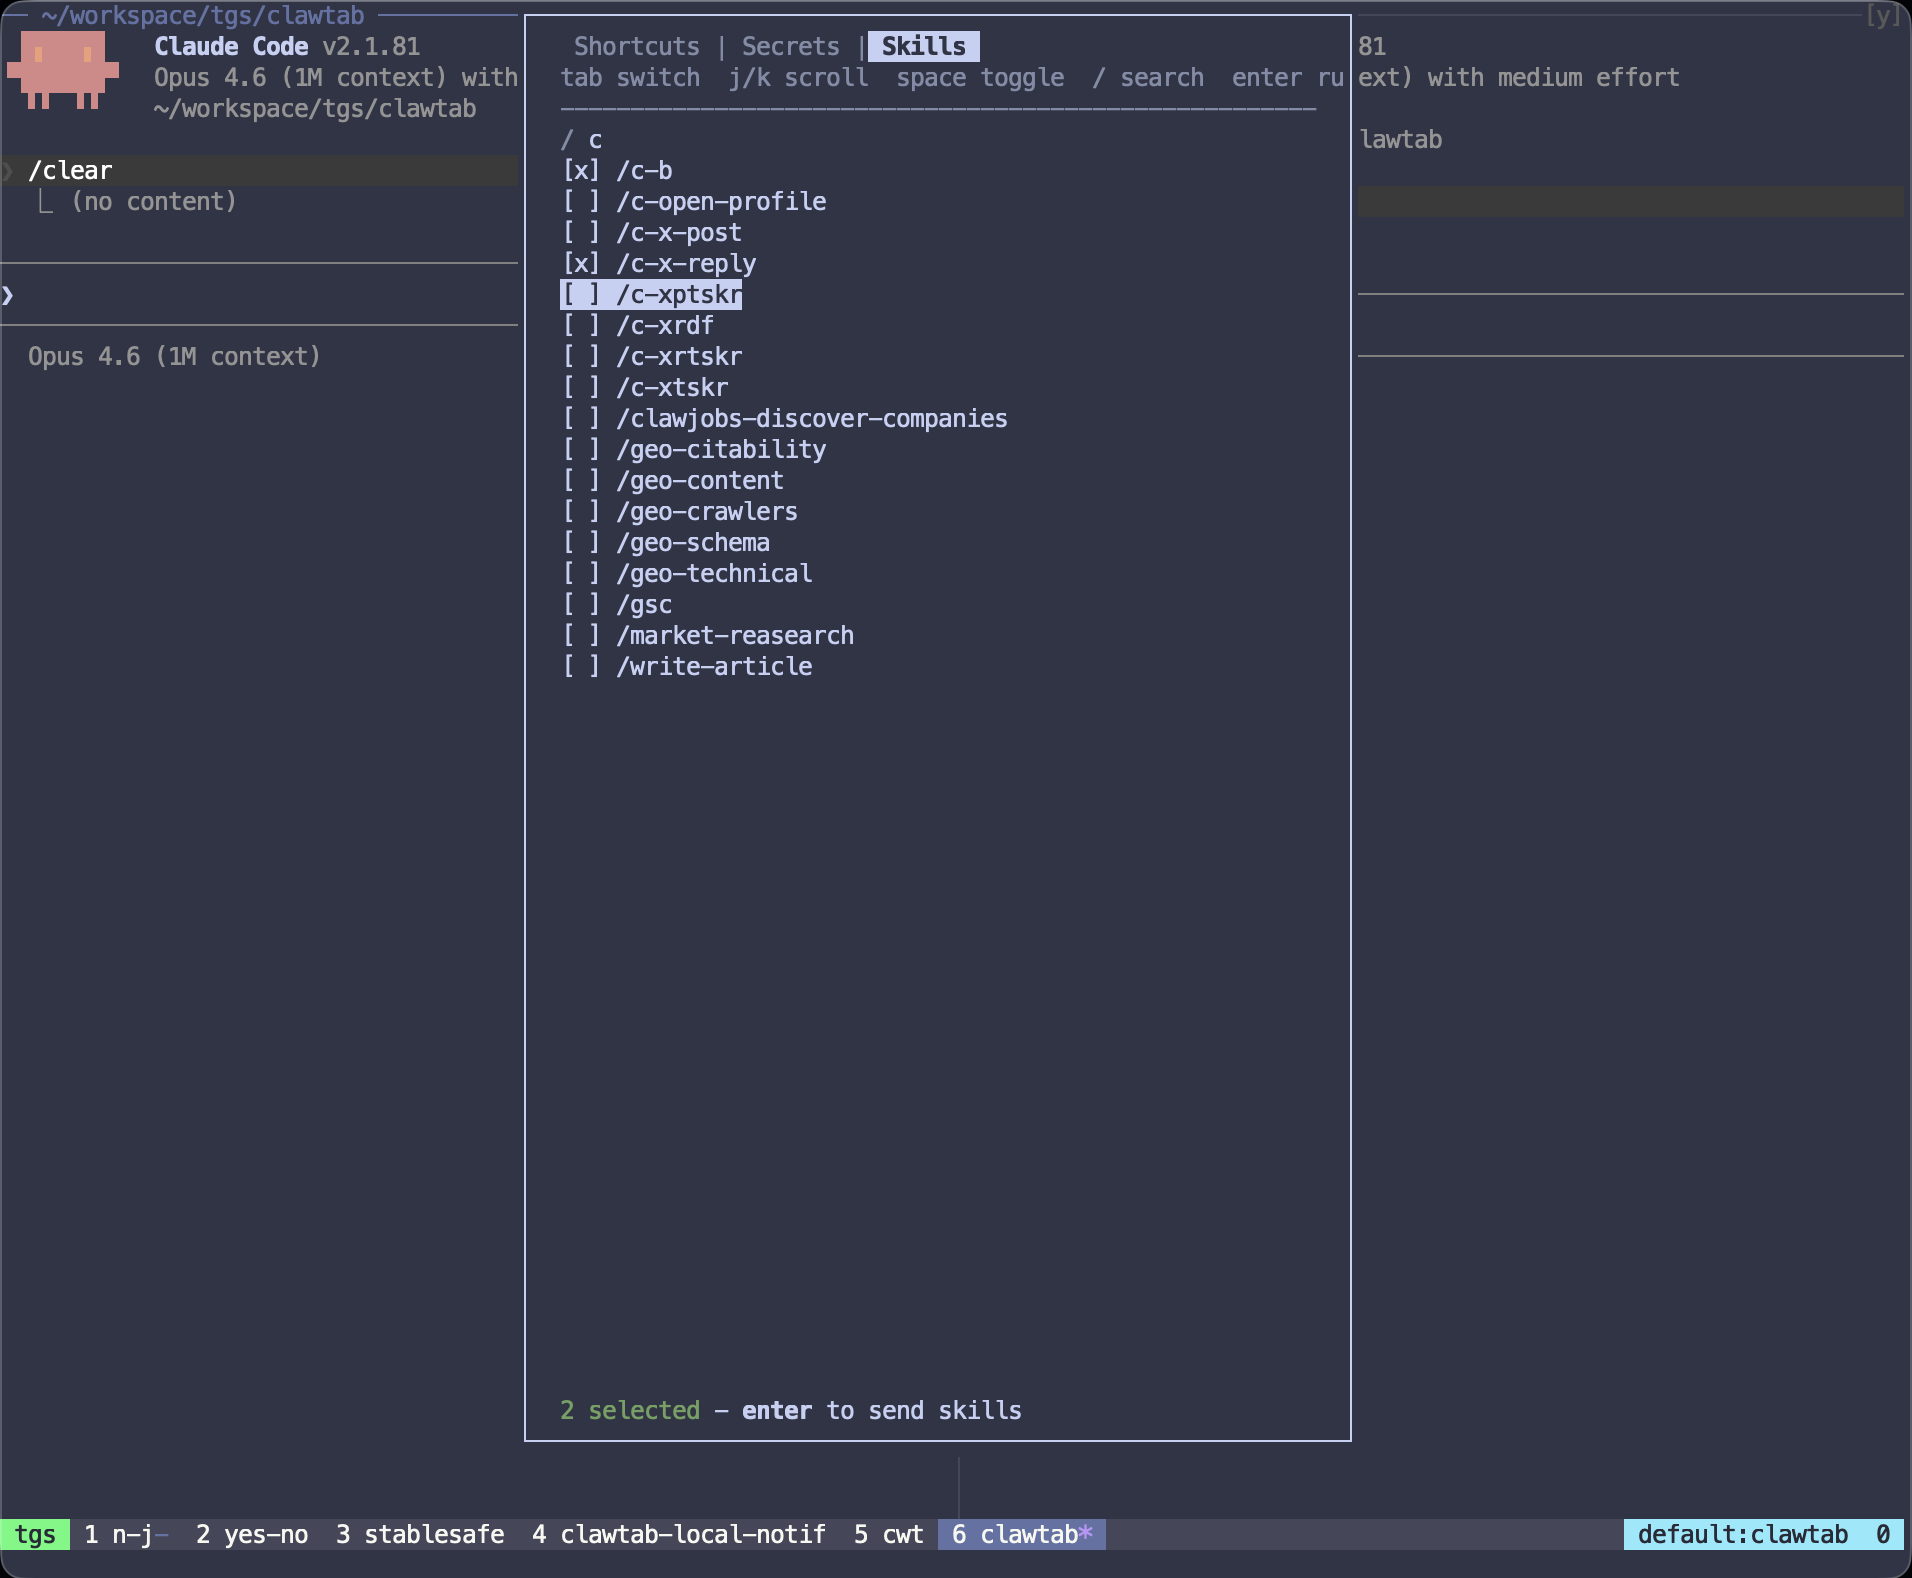
Searching and Sending Skills
The Skills tab shows all skills from your ~/.claude/skills directory. Each skill appears as a /skill-name entry that you can select with Space.
Select one or more skills and press Enter. The plugin types the skill commands directly into your Claude Code pane's input. For example, selecting /c-b and /c-open-profile inserts /c-b /c-open-profile into the chat prompt, ready for you to press Enter or add more context.
The / key opens a search filter that narrows the list as you type. Useful when you have dozens of skills and need to find a specific one quickly.
There's also a standalone skill search with prefix + s that uses fzf for a simpler single-select flow. The popup menu's Skills tab adds multi-select on top of that.
The Auto-Yes Pane Indicator
When the plugin loads, it adds a small indicator to your tmux pane borders. On Claude Code panes, you'll see either:
Regular shell panes show nothing. The indicator only appears when the pane's current command matches a semver pattern (how Claude Code identifies itself).
The indicator updates every 5 seconds via tmux's status interval. When you toggle auto-yes with prefix + y, the state change is stored as a tmux pane option (@clawtab-auto-yes), so the border format picks it up on the next refresh without any shell script overhead.
![Two tmux panes side by side showing the auto-yes indicator - left pane has [Y] in green (enabled), right pane has [y] in dim gray (disabled)](https://cdn.clawtab.cc/assets/articles/tmux/auto-yes-indicator.png)
All Keybindings
The plugin registers five keybindings, all prefixed with your tmux prefix key (usually Ctrl+b):
| Keybinding | Action | Notes |
|---|---|---|
prefix + E | Open ClawTab popup menu | Tabbed TUI with shortcuts, secrets, skills |
prefix + y | Toggle auto-yes | Only works on Claude Code panes |
prefix + o | Open in ClawTab desktop | Opens the pane in the ClawTab GUI via cwtctl |
prefix + s | Search skills (fzf) | Single-select, inserts and runs the skill |
prefix + f | Fork session | Forks conversation into a new pane below |
All keys are customizable via tmux options. Set them in your .tmux.conf before the run-shell line:
# Custom keybindings (set before run-shell)
set -g @clawtab-menu-key "E"
set -g @clawtab-auto-yes-key "y"
set -g @clawtab-open-key "o"
set -g @clawtab-skills-key "s"
set -g @clawtab-fork-key "f"

run-shell ~/path/to/tmux-clawtab/clawtab.tmux
Comparison: Popup Menu vs Direct Keybindings
You can do everything through either the popup menu or direct keybindings. Here's when to use which:
| Task | Popup Menu | Direct Key | Use When |
|---|---|---|---|
| Toggle auto-yes | Shortcuts tab | prefix + y | Direct key is faster for a quick toggle |
| Fork session | Shortcuts tab | prefix + f | Direct key for simple fork, popup for fork with secrets |
| Inject secrets + fork | Secrets tab | - | Only available through the popup |
| Send one skill | Skills tab | prefix + s | Direct key uses fzf, simpler for single selection |
| Send multiple skills | Skills tab | - | Multi-select only available through the popup |
| Open in ClawTab GUI | - | prefix + o | Only available as direct key |
The popup menu is the discovery tool - use it when you're learning the plugin or need multi-select features. The direct keybindings are the muscle-memory path for actions you do frequently.
How It Detects Claude Code Panes
The plugin needs to distinguish Claude Code panes from regular shell panes. It does this by checking pane_current_command - the process name running in the foreground of each tmux pane.
Claude Code reports itself to tmux as a semver string (e.g., 2.1.81). The plugin matches this with a regex: ^[0-9]+\.[0-9]+\.[0-9]+$. If the command matches, it's a Claude Code pane. If not, actions like toggle-auto-yes and fork-session exit silently.
This detection also drives the pane border indicator. The border format template uses tmux's pattern matching (#{m:*.*.*,#{pane_current_command}}) to only show the [y]/[Y] indicator on Claude Code panes. Regular panes get a clean border.
During startup, Claude Code briefly shows as claude before switching to the semver. The popup menu handles both cases.
What Needs the Desktop App
Most of the tmux plugin's features rely on the ClawTab desktop app and its cwtctl CLI. Two features work independently:
- Fork session - pure tmux pane splitting with
claude --continue --fork-session - Skill search and insertion - reads from
~/.claude/skillsdirectory
Everything else needs the desktop app running:
- Auto-yes - the toggle sets a tmux pane option, but the desktop app is what actually reads that flag and sends keystrokes to accept permission prompts. Without it, the
[Y]indicator shows but nothing auto-accepts. - Secret injection -
cwtctl secrets getfetches values from Keychain/gopass - Open in ClawTab -
cwtctl opentells the desktop app to focus the pane
If cwtctl isn't installed, the secrets tab shows "cwtctl not found" and secret-dependent features gracefully degrade. Fork and skill search still work fine.